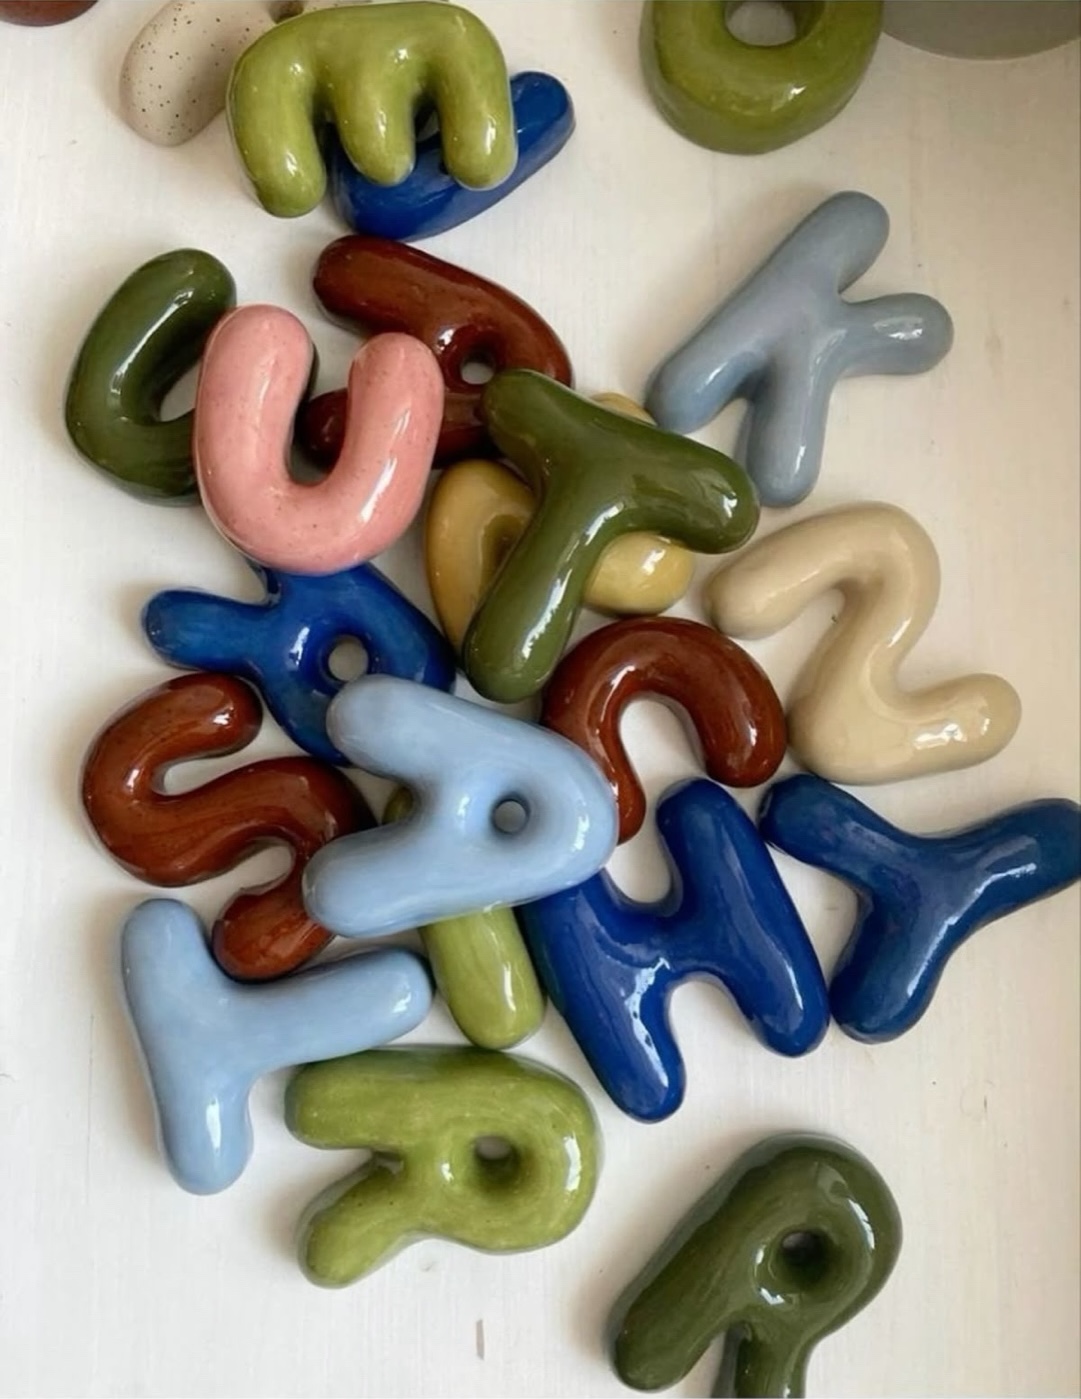
Looking for a fun project for your craft club or a creative night with friends? This one’s for you! Whether you’re hosting a chill clay–chat–and–wine night or crafting solo for some mindfulness time, these handmade clay letters are super satisfying to make — and the glossy ceramic-style finish is so worth it. 😍

I’d been putting off this clay trend for ages, but I’m so glad I finally tried it! Here’s my step-by-step guide (plus all my tried-and-tested tips).
🪄 Step 1: Get Your Clay
You will need Air Dry Clay. You can find great options online— the gray, stone-look type is perfect. It’s soft, smooth, and easy to work with.
🤲 Step 2: Shape Your Letters
Knead the clay until it’s nice and soft, then roll it into “snakes” about 1 cm thick. Form each letter shape, gently flatten them, and smooth the surface with your fingertips dipped in a bit of water. Use a thin layer of water to refine and even out the shape — this helps the letters dry smooth and clean.
🌬 Step 3: Let Them Dry
Patience is key! Let the letters dry completely for at least 48 hours.
🧽 Step 4: Sand It Down
Once dry, lightly sand each piece with fine-grit sandpaper to smooth any rough spots.
🎨 Step 5: Paint in Style
Now for the fun part — painting! You can use wall paint (don’t worry about the matt finish – we will fix that later!) or use high-quality acrylic paint. You can find various good kits on Amazon with various colors.
✨ Step 6: Add That Ceramic Gloss
When your paint is dry, apply a gloss varnish (Mod Podge for example but any will do). The more gloss, the better! I used two generous coats, letting each one dry for about 30 minutes. This step gives your clay letters that perfect ceramic shine.
🪛 Step 7: Finish the Back
Carefully scrape or sand off any paint drips from the bottom. Wipe away dust so the surface is clean, then stick pieces of strong double-sided mounting tape (like Tesa) to the back of each letter.
📍 Step 8: Mount Your Masterpiece
Plan out where you want your letters to go, and lightly press them in place. Adjust as needed until you’re happy with the layout. Once perfect, press firmly and move the letters slightly up and down — that friction helps the tape grip better.
💕 Enjoy the Result!

And that’s it — your DIY clay letters are ready! Whether you make them for yourself or as a personalized gift, the process is as calming as the final result is stunning.
If you try this, I’d love to see your creations! Happy crafting! 🩷✨


Leave a Reply